Integrations
AppDynamics
This document shows you how you can integrate Callgoose SQIBS with AppDynamics.
Incidents will be creating in Callgoose SQIBS when there is a incident created in AppDynamics as per the workflows configured by you in the AppDynamics
In Callgoose SQIBS
Create filter as per the AppDynamics workflows.
- For test purpose, create an API filter like this
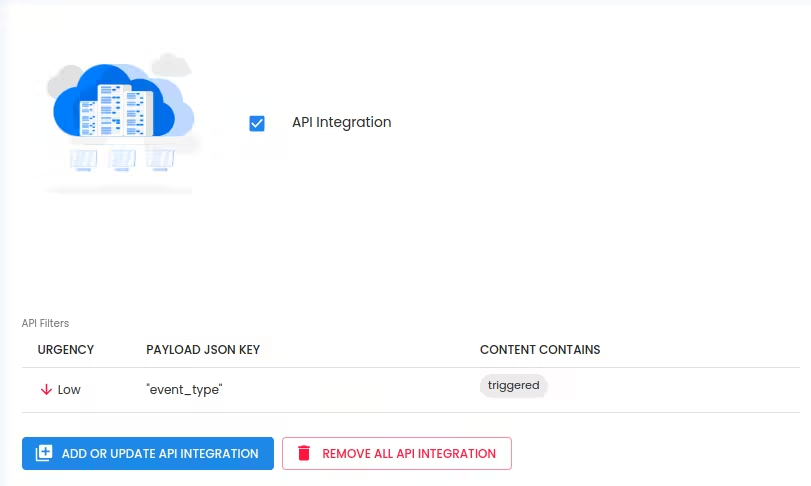
After test, create suitable API filter values depending on the payload sent by AppDynamics to create a meaningful incident.
In AppDynamics
Create Alert in AppDynamics
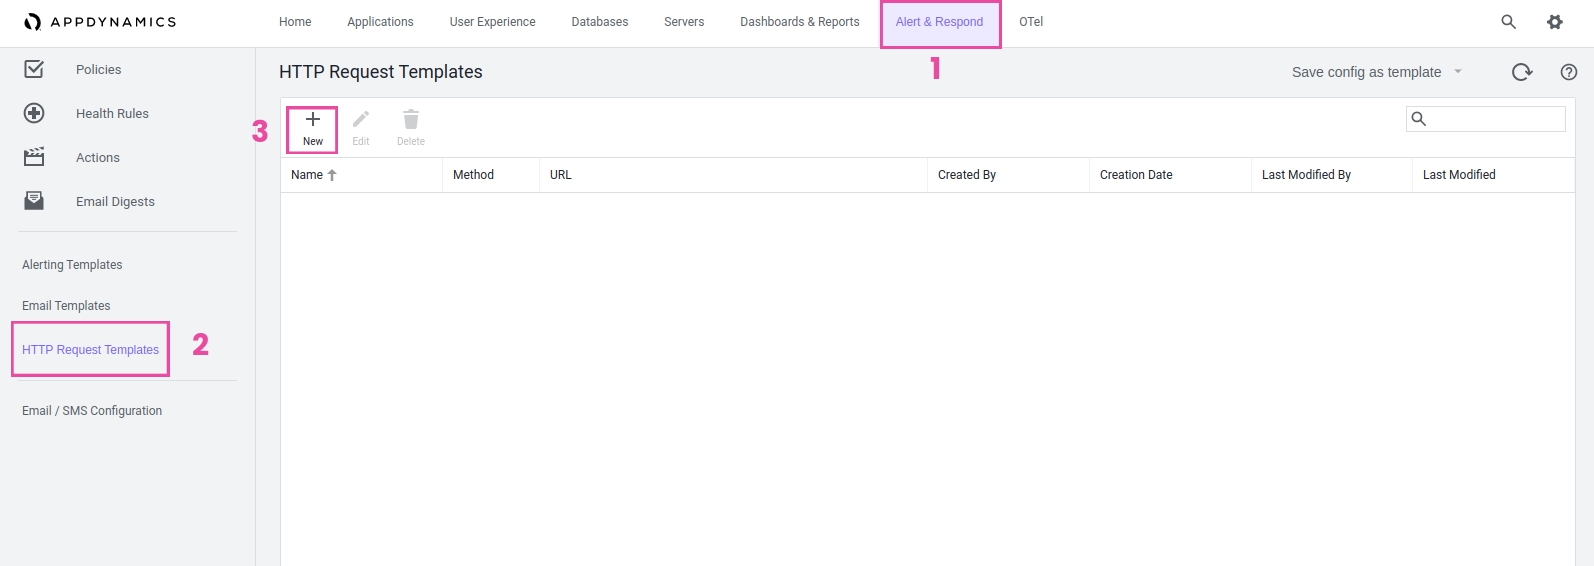
Go to the Alert & Respond tab, then click HTTP Request Templates on the left menu and add a new template by clicking New
- In the Create HTTP Request Template box, enter an appropriate Name suchas CallgooseSQIBS andthen add a Custom Templating Variable named callgoose_event_type and the default value as triggered.
- In the Request URL section, select the Method as POST and paste the URL into Raw URL and URL Encoding as UTF-8 and in the Authentication section, select the Type as NONE.
Webhook url : Enter your API Endpoint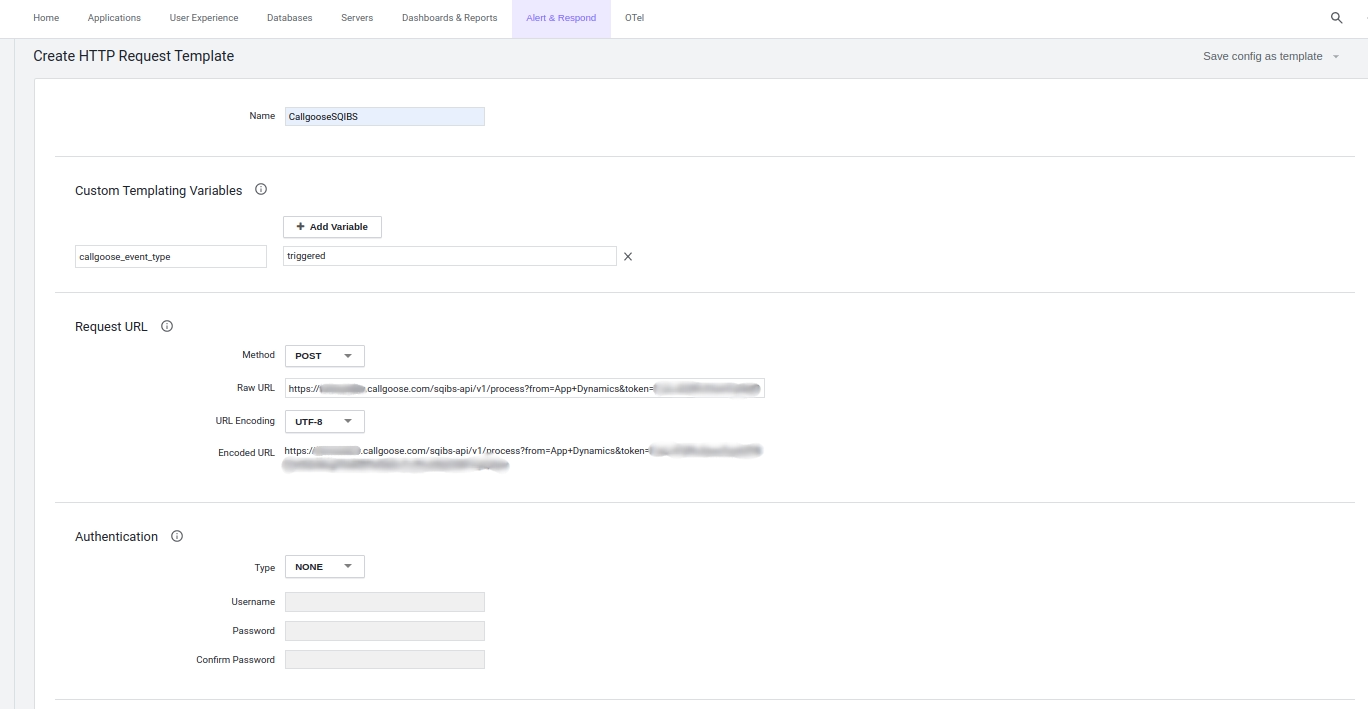
SON.
- In the Payload section, select the MIME Type as application/json and Payload Encoding as UTF-8 and in the payload body, paste the below JSON.
- Custom payload: Use the following JSON payload.
{

   "incident_key": "${latestEvent.node.name} - ${latestEvent.application.name}",
   "event_type": "${callgoose_event_type}",
   "description": "${latestEvent.displayName} on ${latestEvent.node.name}",
   "client": "AppDynamics",
   "client_url": "${controllerUrl}",
   "details":
{
     "event_name": "${latestEvent.displayName}",
     "summary": "${latestEvent.summaryMessage}",
     "event_id": "${latestEvent.id}",
     "guid": "${latestEvent.guid}",
     "event_time": "${latestEvent.eventTime}",
     "event_type": "${latestEvent.eventType}",
     "event_type_key": "${latestEvent.eventTypeKey}",
     "application_name": "${latestEvent.application.name}",
     "node_name": "${latestEvent.node.name}",
     "message": "${latestEvent.eventMessage}",
     "severity": "${latestEvent.severity}"  }
"contexts": [
   {
    "type": "image",
    "src": "$latestEvent.severityImage.deepLink}}",
    "alt": "${latestEvent.severity}"    },
   {
    "type": "link",
    "href": "${latestEvent.deepLink}",
    "text": "View this transaction in AppDynamics"
   }
]
}
- In the Response Handling Criteria section, under Success Criteria, click Add Success Criteria. Select 200 from the Status Code list, check Expect Payload, and set the Content Type to application/json.

- Check One Request Per Event in the Settings section, then click save

Once your template has been saved, you can test it to see if Callgoose SQIBS creates an incident. To test an event, click the Test button , then Add Event Type, choose the event you wish to test, and then click Run Test. Now verify that an incident was created by checking your Callgoose SQIBS account. If there isn't an incident that has been triggered in Callgoose SQIBS, scroll to the very bottom of the Test Transcript and look for any mistakes in the Response Payload.
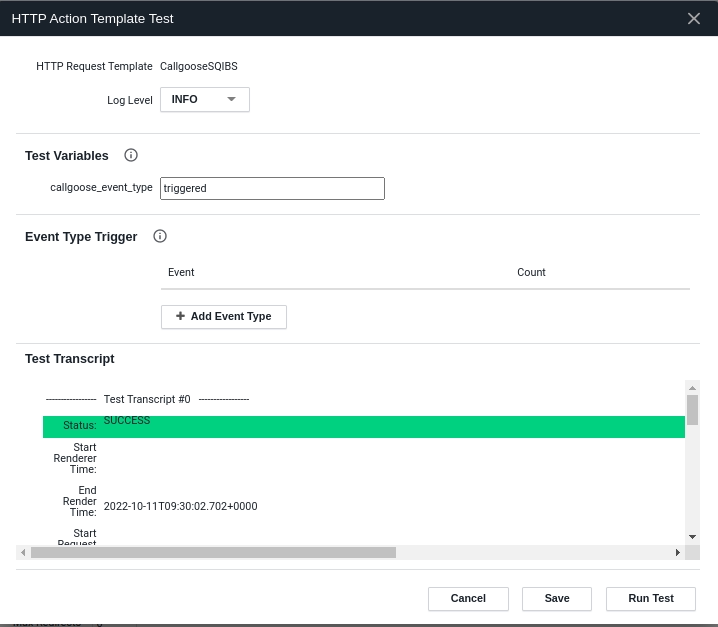
1. Please make sure you have added API filter contains values in Callgoose SQIBS before you send test notifications.
2. You can decide on ‘what AppDynamics payload’(customise the values in the Custom payload section) you need notifications in Callgoose SQIBS and depending upon that you can create the API filter values in the Callgoose SQIBS
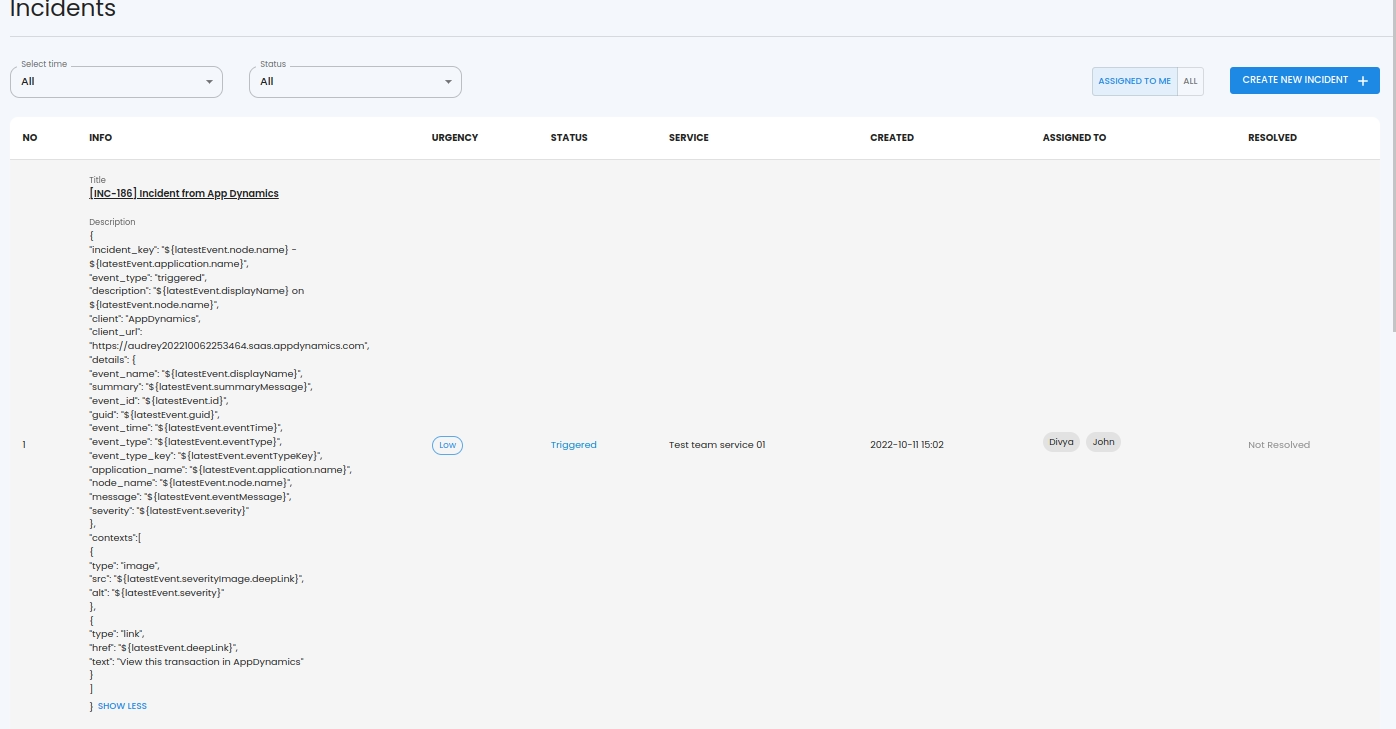
You can see that Callgoose SQIBS created the Incident as per the above App Dynamics payload values’
Now whenever an alert notification is triggered in AppDynamics, an incident will automatically be created in Callgoose SQIBS if the API Filter is success for the payload.
You can click on Run Test after expanding the created notification to send sample notifications again to Callgoose SQIBS.
Create Actions in AppDynamics
- Click Actions on the left menu, then select an application or database to create actions for, then click Create Action.
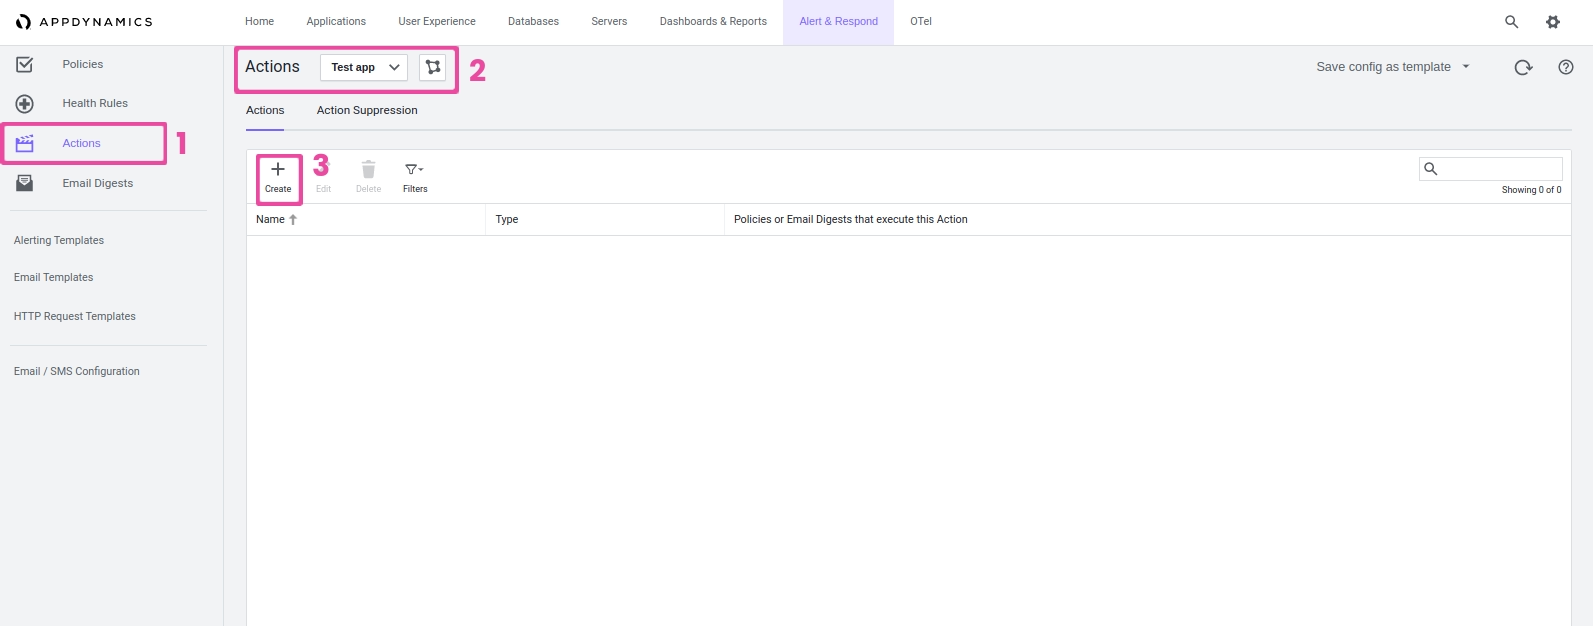
- Select Make an HTTP Request from the list in the Create Action window, then click OK.
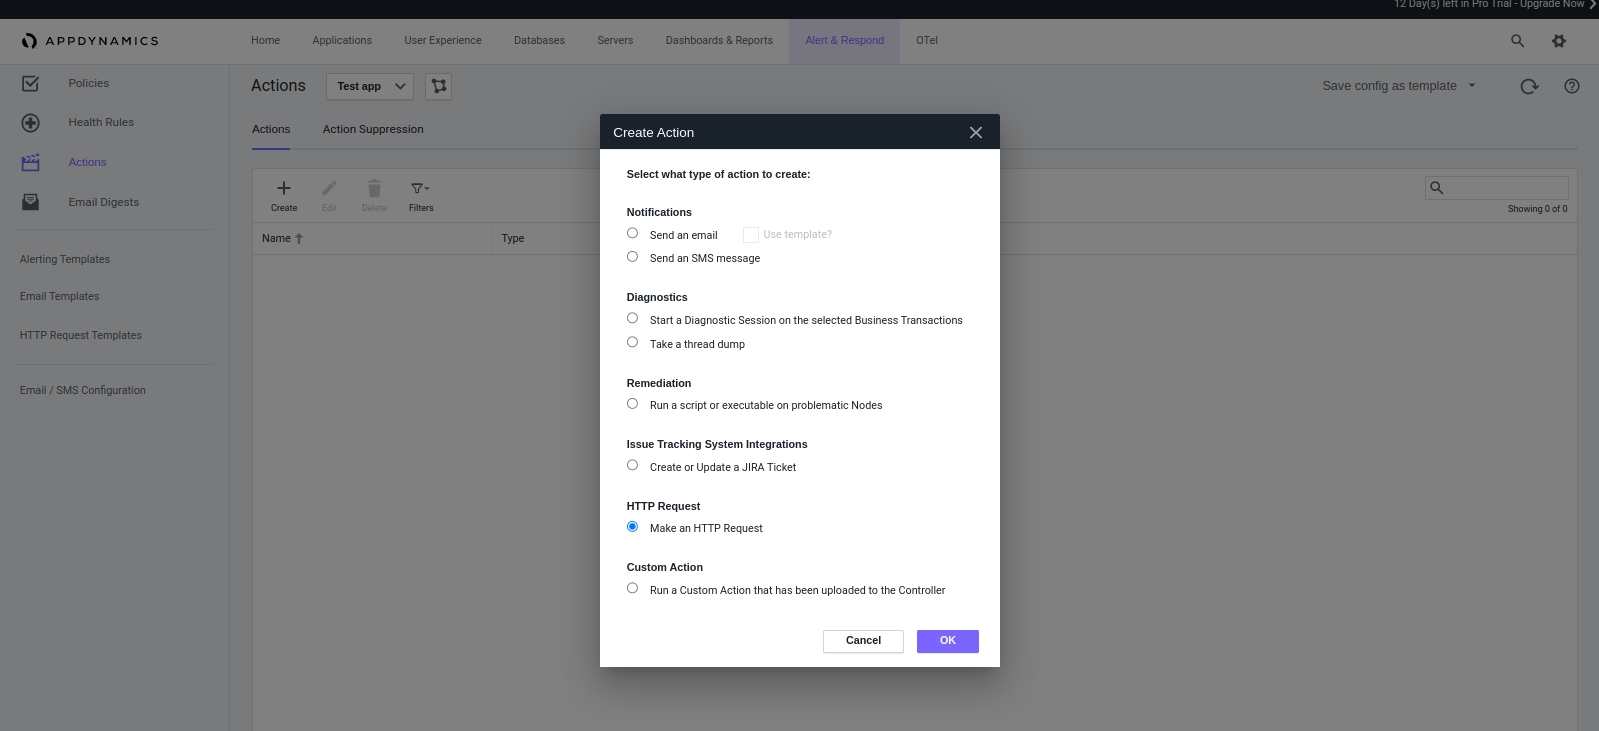
- Fill the action name(like “CallgooseSQIBS-Triggered”) in the Create HTTP Request Action window and select the template you just created from the list, then click Save.
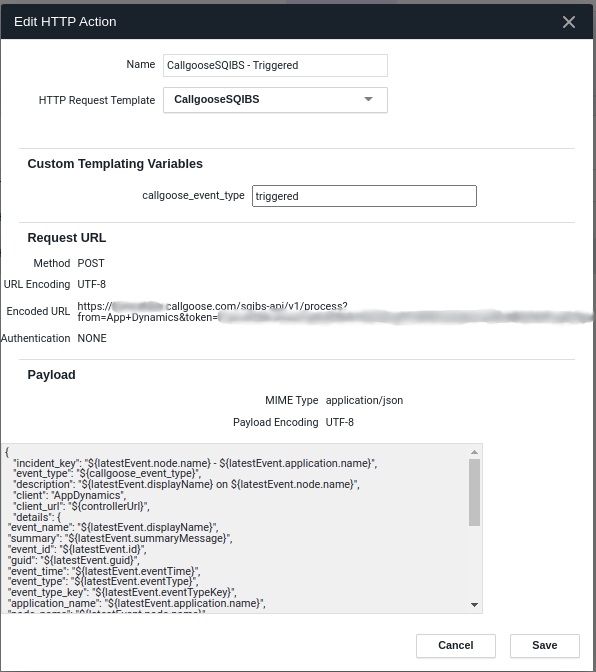
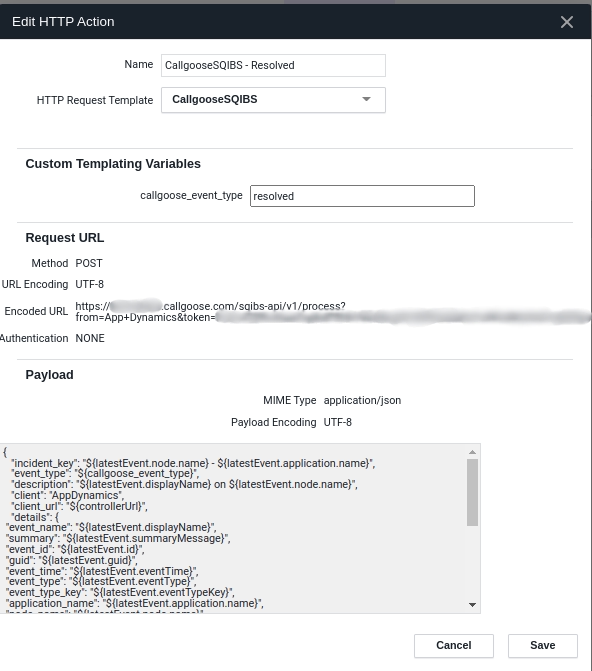
- Make another action that will be utilised for incident resolution. Give the action a name (such as "CallgooseSQIBS - Resolved") and pick the newly formed template once more.
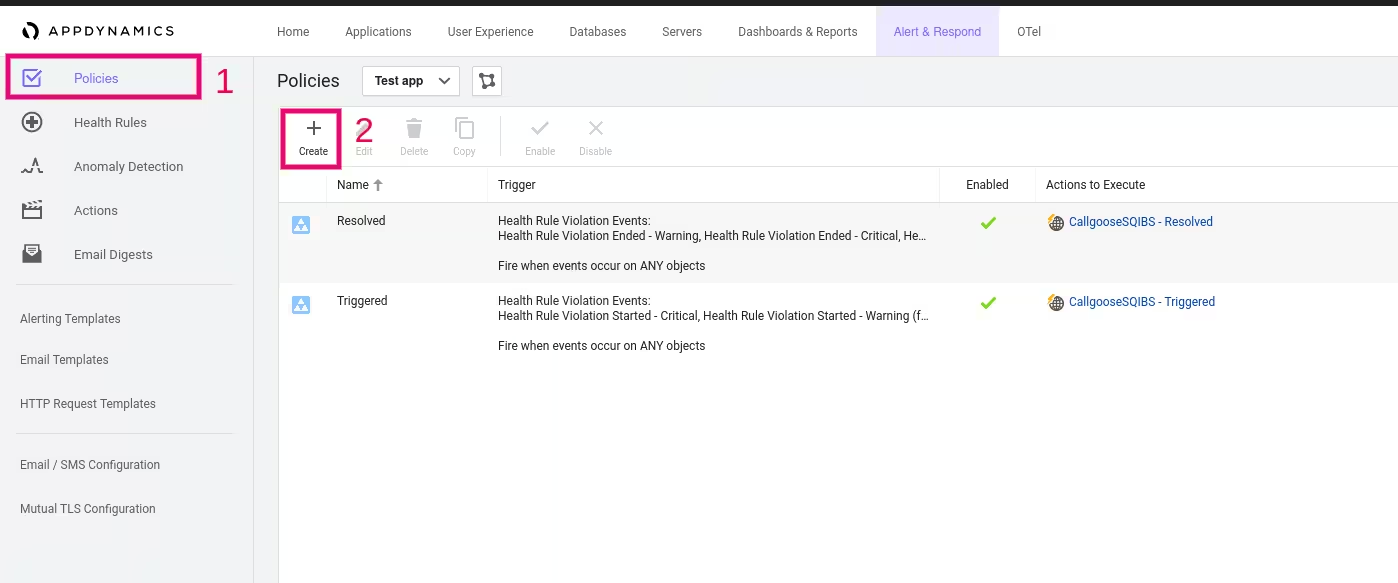
- The last step is to add these actions to your desired policies. Click Policies on the left menu, and click on the Create button.
Add Trigger action :-
- In Trigger tab Enter a name and select all Critical or Warning events which has started.
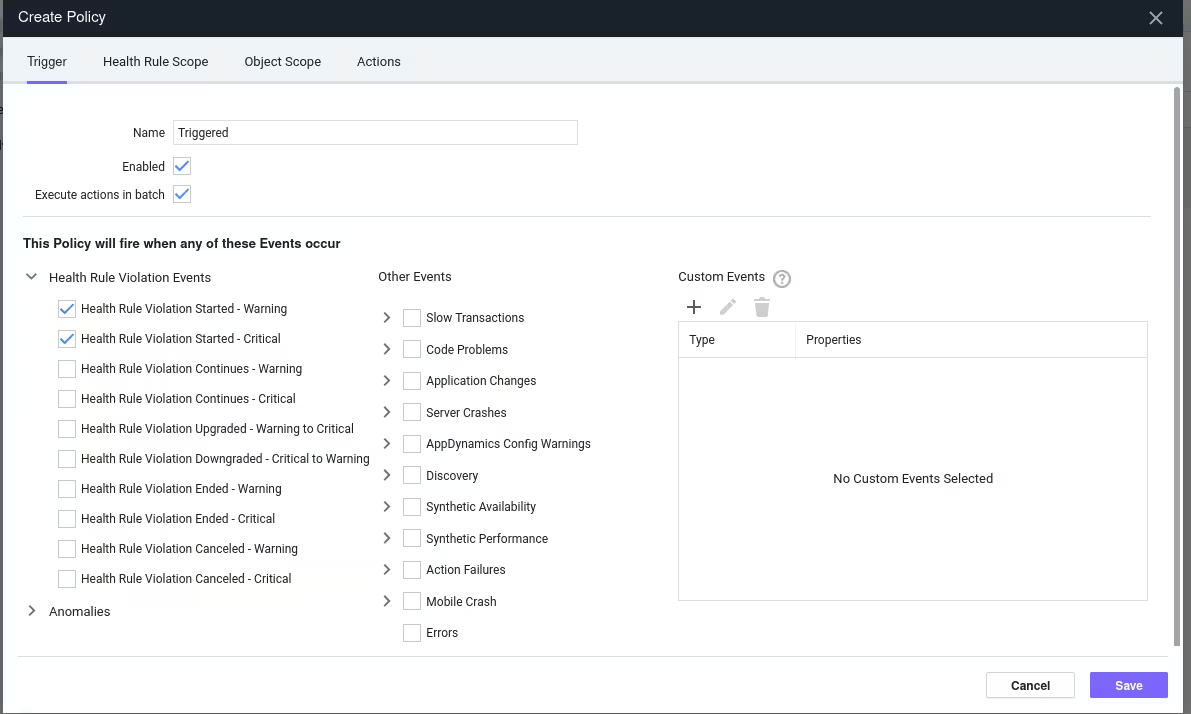
- In Action tab Click the Actions tab and click the plus + button under Actions to Execute. Select the desired action created for trigger incident, click Select, then click Save.
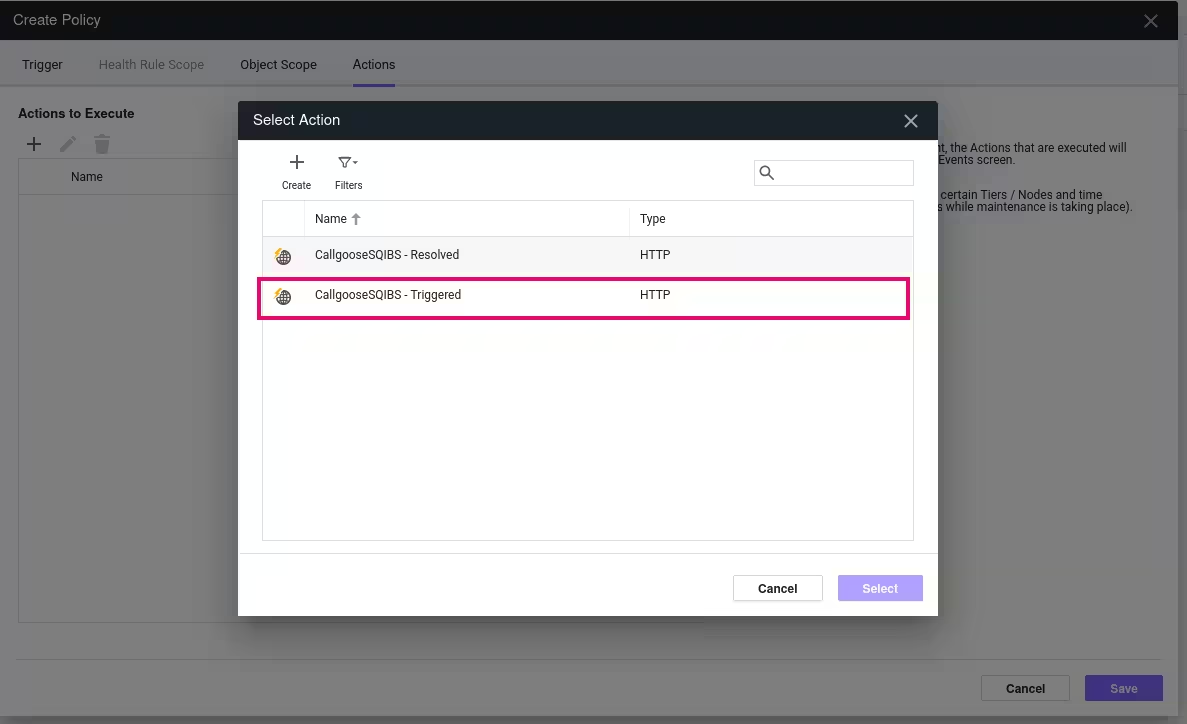
Add Resolved action :
- In Trigger tab Enter a name and select all Critical or Warning events which was cancelled or ended
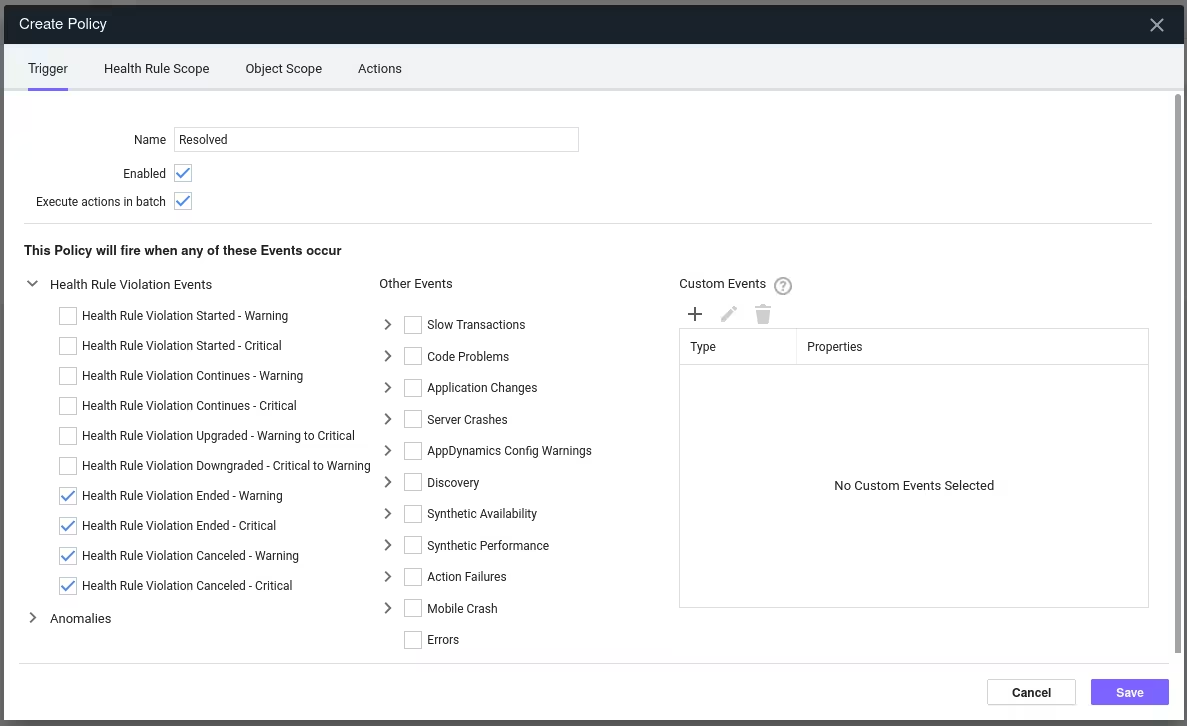
- In Action tab Click the Actions tab and click the plus + button under Actions to Execute. Select the desired action created for resolve incident, click Select, then click Save.
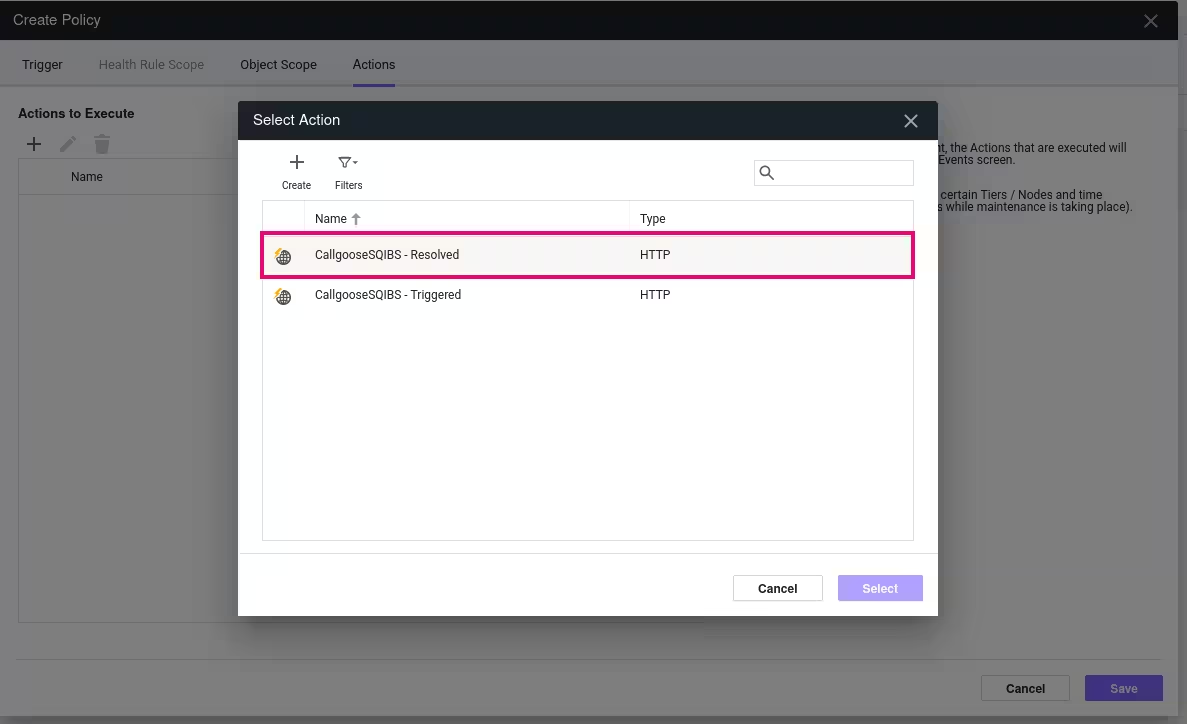
When AppDynamics payload 'event_type' value is 'triggered,' it triggers an incident in SQIBS. Likewise, when the 'event_type' is 'resolved,' it automatically resolves the incident in SQIBS.
When these steps are finished, Incidents should be triggered/resolved in CallgooseSQIBS whenever a policy trigger condition is fulfilled in AppDynamics.

