Getting Started
Special
SINGLE SIGN-ON
Teams
Users
Escalation Policies
Service
Incident
Request
On-Call Shift
Schedules
Schedule Override
Logs
API
Webhook
Apps Integration
Reports
Preference
Profile
Automation
Self-Service Portal
Mobile App
SLA
FAQ
Webhook
Webhook is a way for an application to provide other applications or third-party APIs with real-time information. When an event occurs in the application that is being monitored by the webhook, the webhook sends an HTTP request to a specific URL. The payload contains information about the event that occurred.
In Callgoose SQIBS you can configure Outgoing webhook(sending webhook from SQIBS to other applications) and Incoming webhook(Referred as API integration ) This page shows the details about Outgoing webhook.
Types of Outgoing Webhooks
3 types of Outgoing Webhooks defines the different level of accessibility.
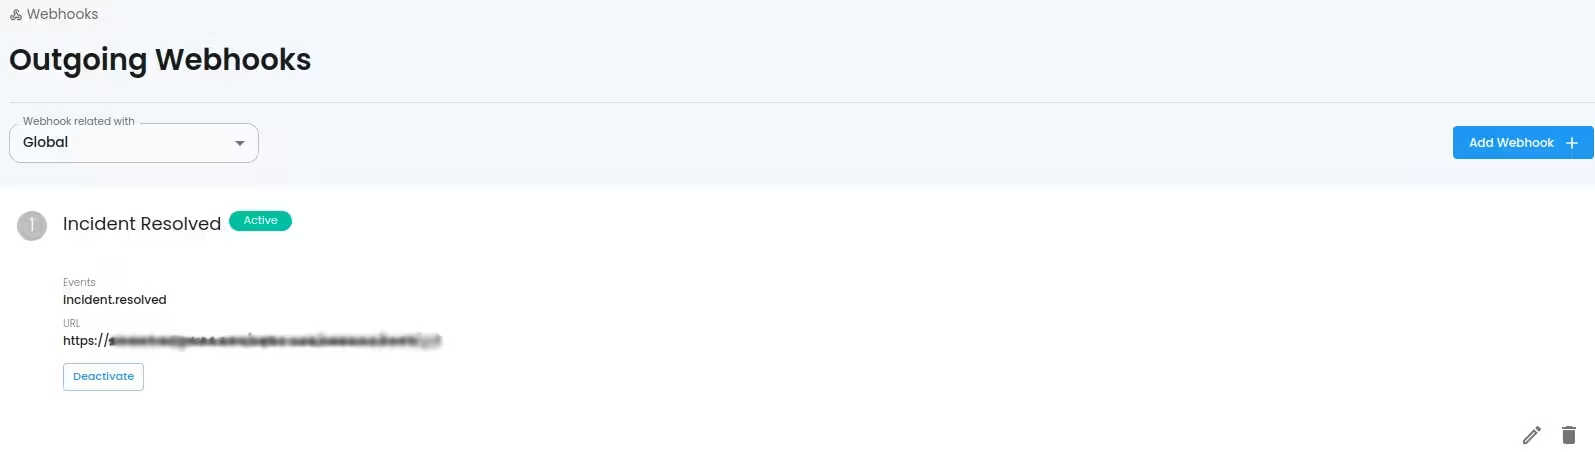
Global Outgoing Webhook
These webhooks are invoked for every Team. This webhook will be called if there is an event (specified in the webhook) happened under any Team.
- You can create/update/delete a Global Outgoing Webhook by selecting the 'Global' from 'Webhook related with' dropdown
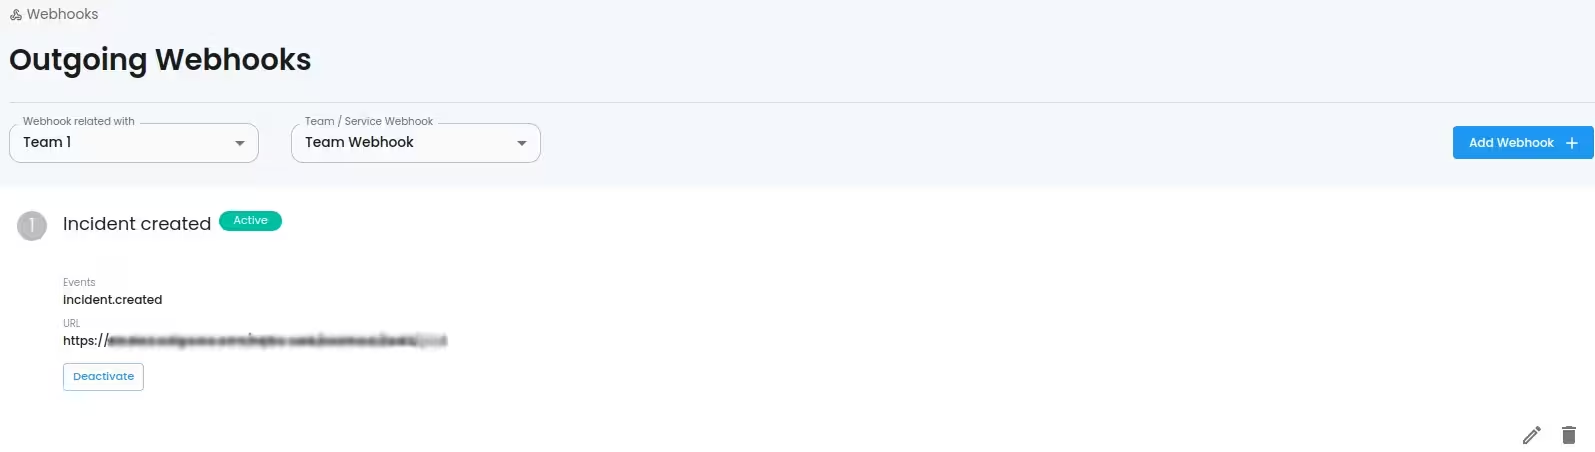
Team Outgoing Webhook
These webhooks are invoked only for a specific Team related with the webhook. This webhook will be called only if there is an event (specified in the webhook) happened under the specific Team.
You can create/update/delete a Team Outgoing Webhook by selecting the specific Team from 'Webhook related with' dropdown
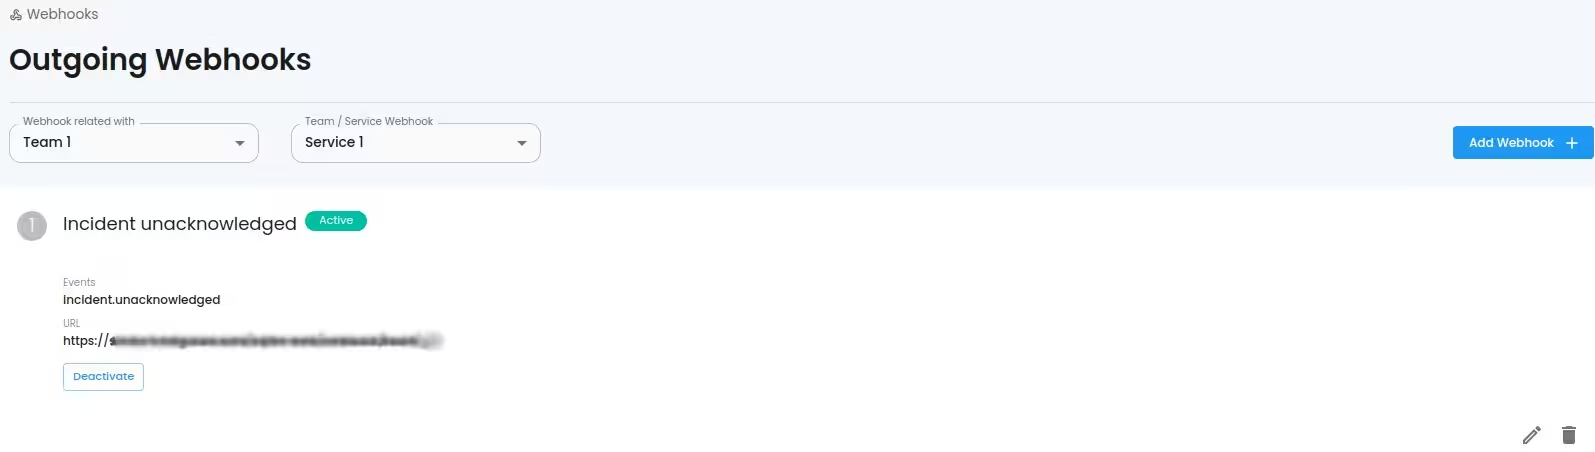
Service Outgoing Webhook
These webhooks are invoked only for a specific Service related with the webhook. This webhook will be called only if there is an event (specified in the webhook) happened under the specific Service.
You can create/update/delete a Service Outgoing Webhook by selecting the Team related to the Service from 'Webhook related with' dropdown.
How to add Outgoing Webhook?
- Select Webhook in Dashboard
- Select Add Webhook button at the top right of the main window.
- You can see a new input segment to add Webhook details.
i. Name
- Enter the Name of the Webhook.
ii. Description
- This is an optional field in which you can enter the Description of the Webhook.
iii. Events
The Events that will trigger the Webhook. You can select multiple events.
> Incident Created
> Incident Acknowledged
> Incident Unacknowledged
> Incident Resolved
iv. Url
- Enter the Url endpoint of the Webhook. This must be a valid URL
v. HTTP method
The HTTP method that the Webhook endpoint will use.
> GET
> POST
> PUT
> DELETE
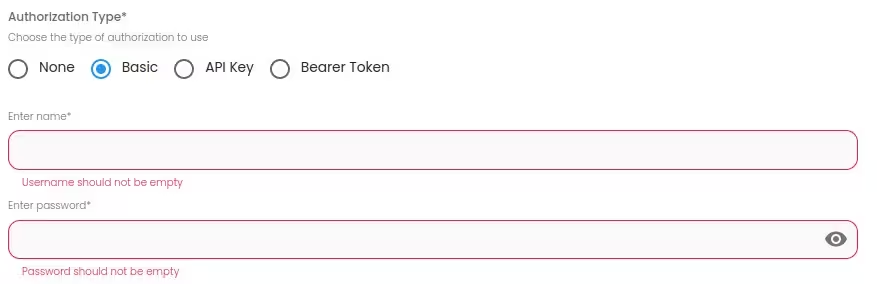
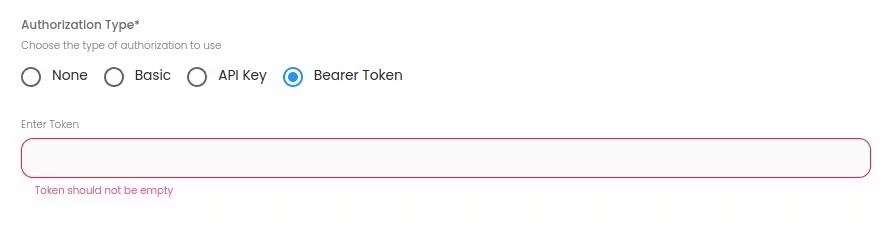
vi. Authorization type
The type of Authorization that the Webhook will use. Four options are provided.
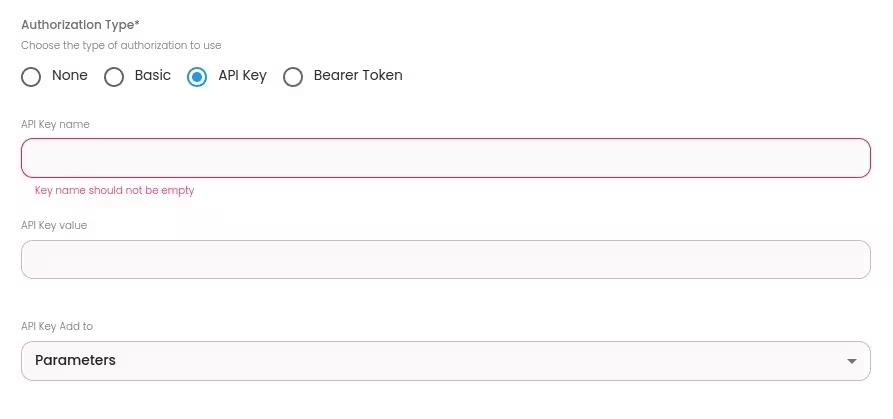
vii. Headers
Enter any Custom Headers that should be included with the Webhook request. You can add upto 20 headers.

viii. HMAC signing
Whether or not to use the HMACSHA512 algorithm. Know more HMAC and SHA-512
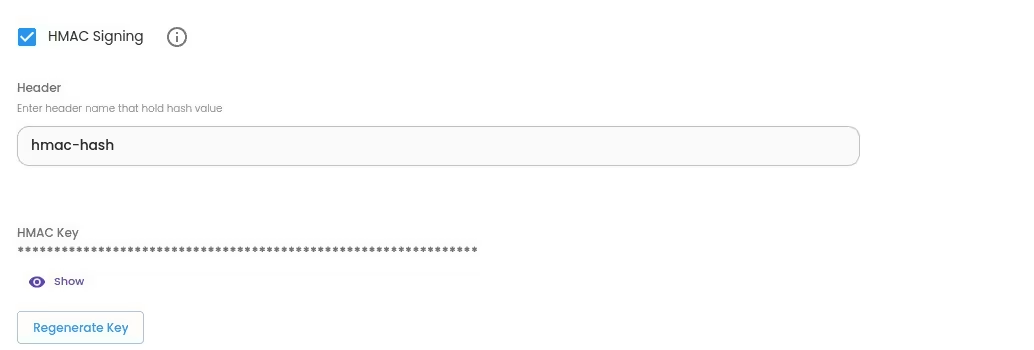
How to verify hmac signature on receiving side?
- The header(header name is the one you specified) value will contain the timestamp(GMT/UST timestamp in string format. eg: 1685549253) and signature. Value will be like: timestamp,signature
To create signature, first you need to create a String(let use name signPayload). signPayload is created by concatenating,
- The timestamp(from step 1)
- The character .(Dot)
- The actual payload (that is, the request body)
- Using the signPayload as data and hmac key from SQIBS dashboard as key, compute an HMAC with the SHA512 hash function. The result will be the signature.
a. Compare the signatures
-> Compare the signature(second item in step 1) from header value with signature created in step 2. If they are equal then the verification is success.
-> For additional security you can check the difference between current timestamp and the received timestamp. Based on the difference you can decide to take the webhook or not.
xi. Send data using
How we need to send the data with the webhook request? This can either be using request body or query parameters.
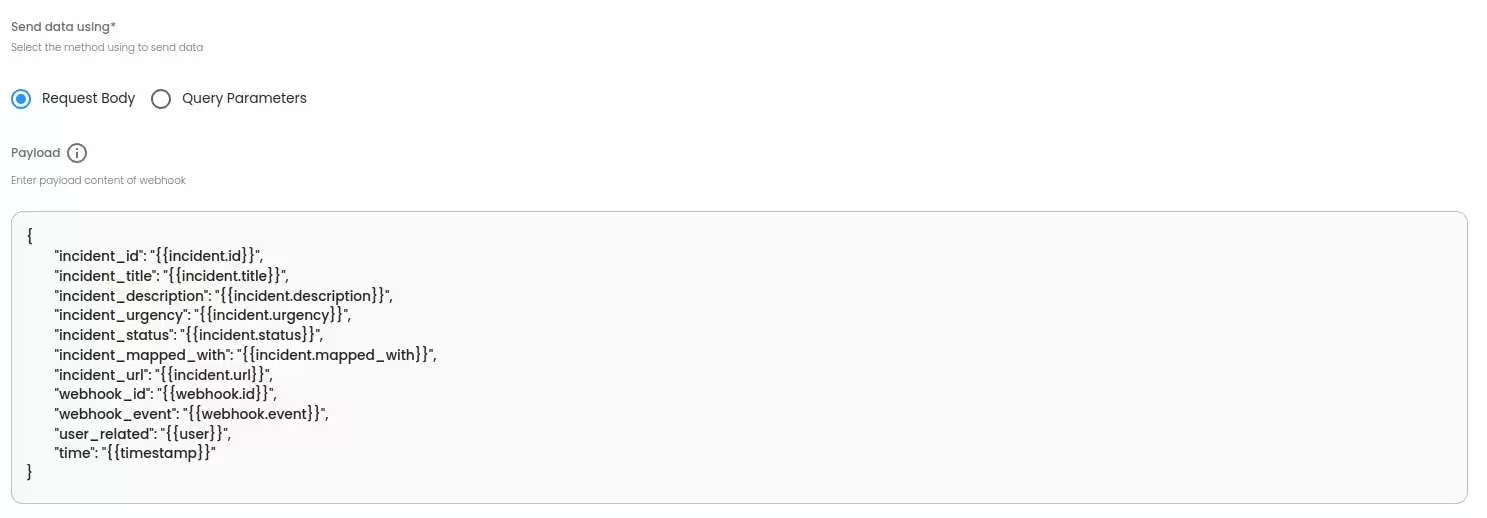
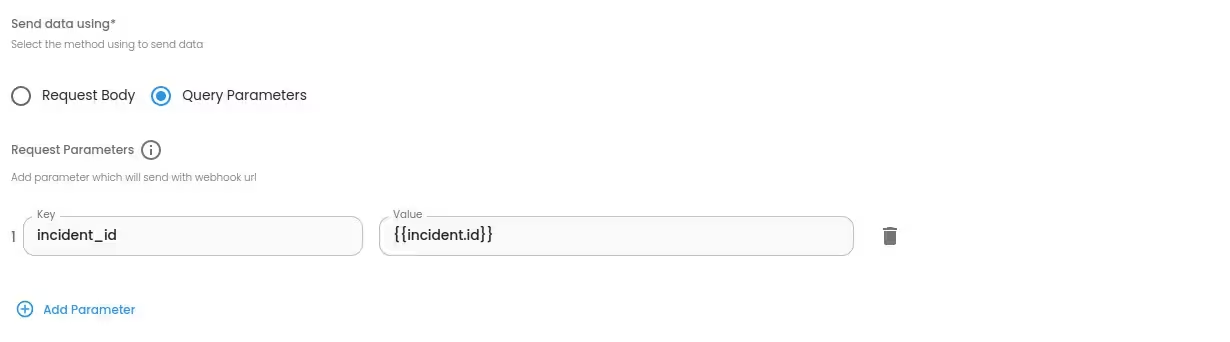
You can create custom request body payload or query parameter values using words or formats as you like with SQIBS placeholders.
SQIBS placeholders
Placeholders are used as parameters in the payload of your webhook notifications. These placeholders are used to dynamically fill in particular values for your notification.For example, if you specified {{incident.title}} in your payload, it would be replaced with the title of the incident in the delivered payload.
Valid placeholders
- {{incident.id}} - Id of incident
- {{incident.title}} - Title of incident
- {{incident.description}} - Description of incident
- {{incident.urgency}} - Urgency of incident
- {{incident.status}} - Status of incident
- {{incident.mapped_with}} - Value used to map the incident while creation
- {{incident.url}} - URL of incident
- {{webhook.id}} - Id of webhook
- {{webhook.event}} - Event of webhook
- {{user}} - User related with this event
- {{timestamp}} - Timestamp of webhook(When it sent) - format: yyyy-MM-ddTHH:mmZ
Conditional placeholder logic
You can use conditional type logic to create specific values as you need using placeholders.We are using 2 keywords: if and return to handle the logic.
- if: Used to check an expression. We are using the format if(placeholder==placeholder_possible_value) return(return_value);if the placeholder value is same as placeholder_possible_value we entered, then we will use the content specified inside return( and );Note: The order is important. LHS of == must be the placeholder and RHS must be the possible value. Should not add any extra spaces either.
- return: Used to return/select the specific value. We are using the format return(return_value);return keyword is used with if keyword and also as a stand alone. When used as stand alone(There is no if) it is considered like an else condition.Eg: if(placeholder==placeholder_possible_value) return(return_value); return(another_value): Here if the placeholder value is same as placeholder_possible_value we entered, then we will use return_value. if the placeholder value is not same as placeholder_possible_value we entered, then we will use another_value.
- Valid placeholders supported in if are:
- {{incident.urgency}} - high/low
- {{incident.status}} - triggered/acknowledged/resolved
- {{webhook.event}} - incident.created/incident.acknowledged/incident.unacknowledged/incident.resolved
- Custom payload example: consider a payload syntax to populate the values dynamically.
{ "id" : "{{incident.id}}", "title" : "{{incident.title}}", "urgency" : {{{ if(incident.urgency==high) return("high"); if(incident_urgency==low) return("low"); return ("none"); }}}}
- "id" : "{{incident.id}}"
- : This line sets the value of the
- "id"
- field in the JSON object to the placeholder "{{incident.id}}".It will be replace "{{incident.id}}" with the actual incident ID value. And the "{{incident.title}}" with the actual incident title.
- "urgency" : {{{ if(incident.urgency==high) return("high"); if(incident.urgency==low) return("low"); return ("none"); }}}: This line is a conditional logic to determine the value of the "urgency" field using if and return.It checks the value of the variable "incident.urgency" and returns "high" if it is equal to high, "low" if it is equal to low, and "none" otherwise. The conditional logic should be inside triple curly braces "{{{...}}}", after each if and return use (;) semicolon to separate next condition.if(incident.urgency==high): This line initiates a conditional statement using the if keyword. It checks if the value of the variable incident.urgency is equal to the value high.return ("high"): If the condition incident.urgency==high is true, the code executes the return statement, which means the rule returns the value "high". So "urgency" : "high"
- A valid JSON representation of the above payload after processing could look like:
{ "id" : "INC-123", "title" : "Its a title", "urgency" : "high"}
- The placeholders
- "{{incident.id}}"
- and
x. Retry count
- The number of times to retry sending the webhook request it it fails (0-4)
xi. Retry interval
- The interval between retries if the webhook request fails (1-5)
xii. Failure Notification Email
- An email address to notify the webhook request failure/deactivation.
TEST
- Click the Test button to check the webhook configuration. We will send a test webhook and the result will show immediately.
SAVE
- Click the SAVE button to save the webhook configuration.
CANCEL
- Click the CANCEL button to cancel and discard any changes made.
Update Webhook
Delete Webhook
To delete webhook use the Delete Icon at bottom right corner of corresponding webhook.
